On 26 March 2013, Brian Carrier issued new version of Autopsy which runs on Windows platform. It is version 3.0.5 with nice GUI. This version does not use browser as a medium to view the results of forensic analysis like Autopsy v2 in Linux. The good news about Autopsy is that it is free of charge which is distributed under a Apache 2 license. For my self and others, I recommend this tool is one of forensic tools used for digital forensic analysis in more details.
Below is the description about Autopsy which is quoted from its website:
Autopsy is a graphical interface to The Sleuth Kit and other analysis tools. It was designed to be an extensible platform so that it can be an end-to-end digital forensics solution that incorporates plug-in modules from both open and closed source projects.
This page describes the concepts of version 3, which is a complete re-write from version 2. Version 3 currently only runs on Windows. If you perform digital forensics on a non-Windows system, refer to the version 2 page.

You can download Autopsy from the Downloads page and see the full set of features on the Features page.
The following concepts were essential to the design of Autopsy 3:
- Extensibility: No single vendor can provide a solution to every analysis problem and no one knows what analysis techniques will work best on tomorrow's problems. Autopsy was designed with this in mind. In several places, it uses frameworks that allow plug-in modules to be easily inserted. This allows you to customize Autopsy to suit your analysis needs and extend it with custom or third-party modules.
- Ease Of Use: Digital forensics tools should be intuitive and approachable so that they can be effectively used by non-technical investigators. Autopsy 3 uses wizards to help the investigator know what the next step is, uses common navigation techniques to help them find their results, and tries to automate as much as possible to reduce errors.
- Fast Results: As media grows in size, it takes longer to analyze all of it. Autopsy tries to give the investigator relevant information as soon as possible. It analyzes user folders over system folders. It alerts you to hash set hits as soon as they are found and you can change the settings to only focus on important things if you have limited time (i.e. triage).
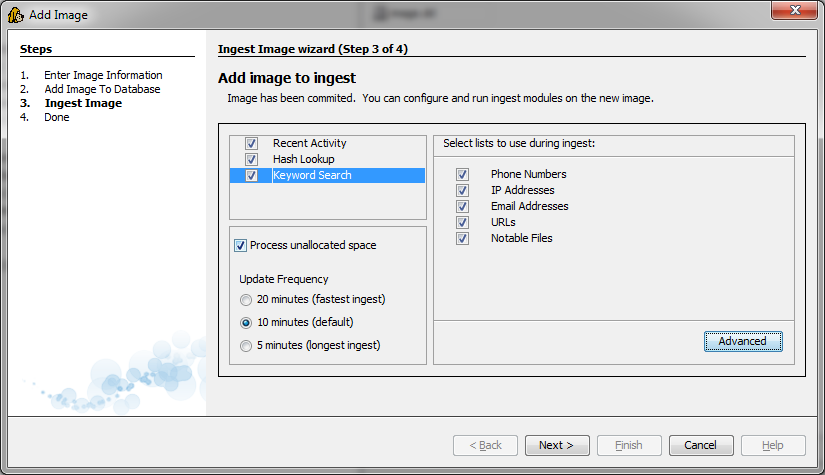
Ingest Modules analyze the disk image contents. When the investigator adds a disk image to the case, he is prompted to enable and configure the ingest modules (screen shot). The basic version of Autopsy comes with ingest modules for:
- Hash calculation and lookup
- Indexed keyword search using open source SOLR/Lucene
- Recent user activity (web artifacts, recent documents, etc) using Pasco2, RegRipper, and SQLite libraries.
- MBOX / Thunderbird files
- EXIF Extraction
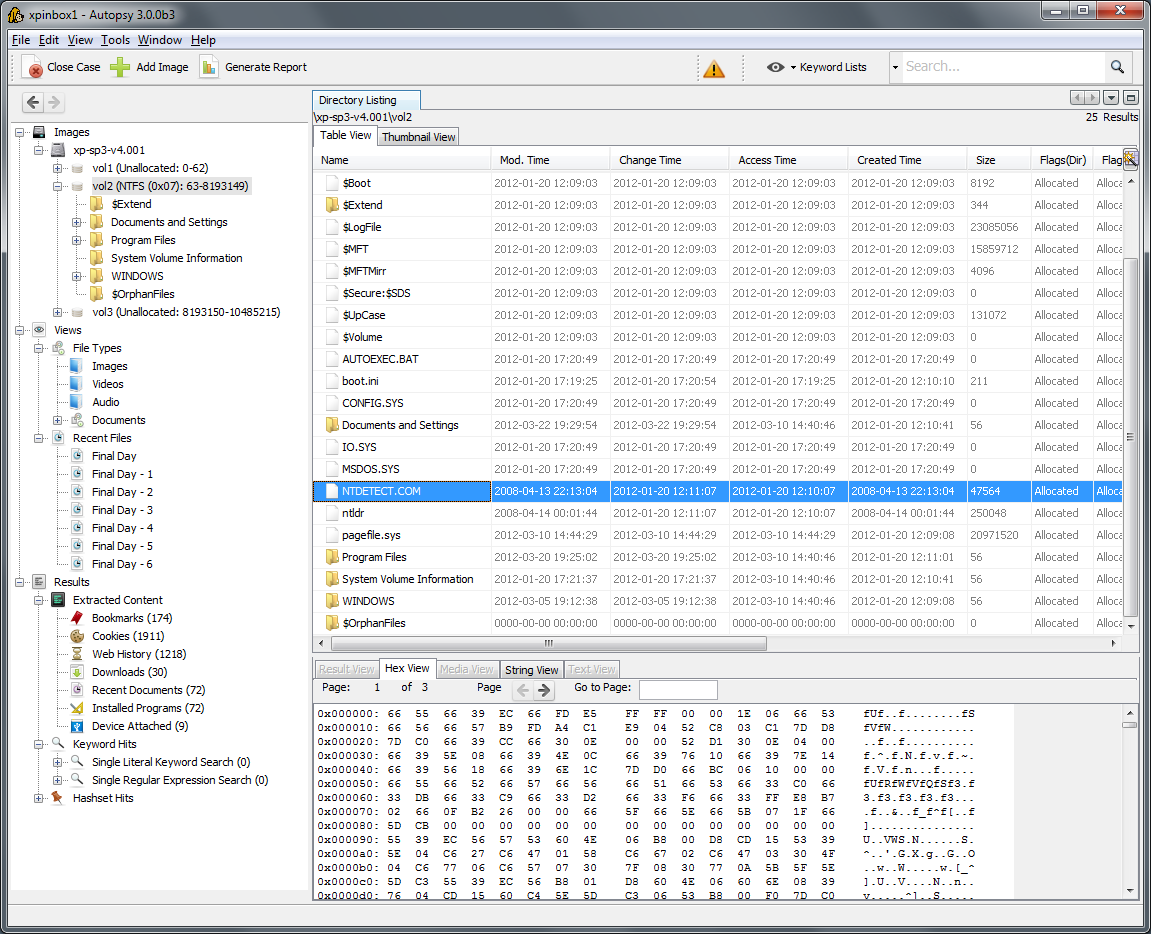
Content viewers allow the examiner to view a single file. Different viewers display the file in different formats. Examples include hex, strings, and media (images, video, etc. using gstreamer) (screen shot). Additional viewers can be created to view different file types (such as advanced text analytics or image analysis).
Report modules create the final report. They access the central database to collect the results from all of the ingest modules. The basic version of Autopsy comes with an HTML and Excel report format. You can make other modules to report in custom formats.
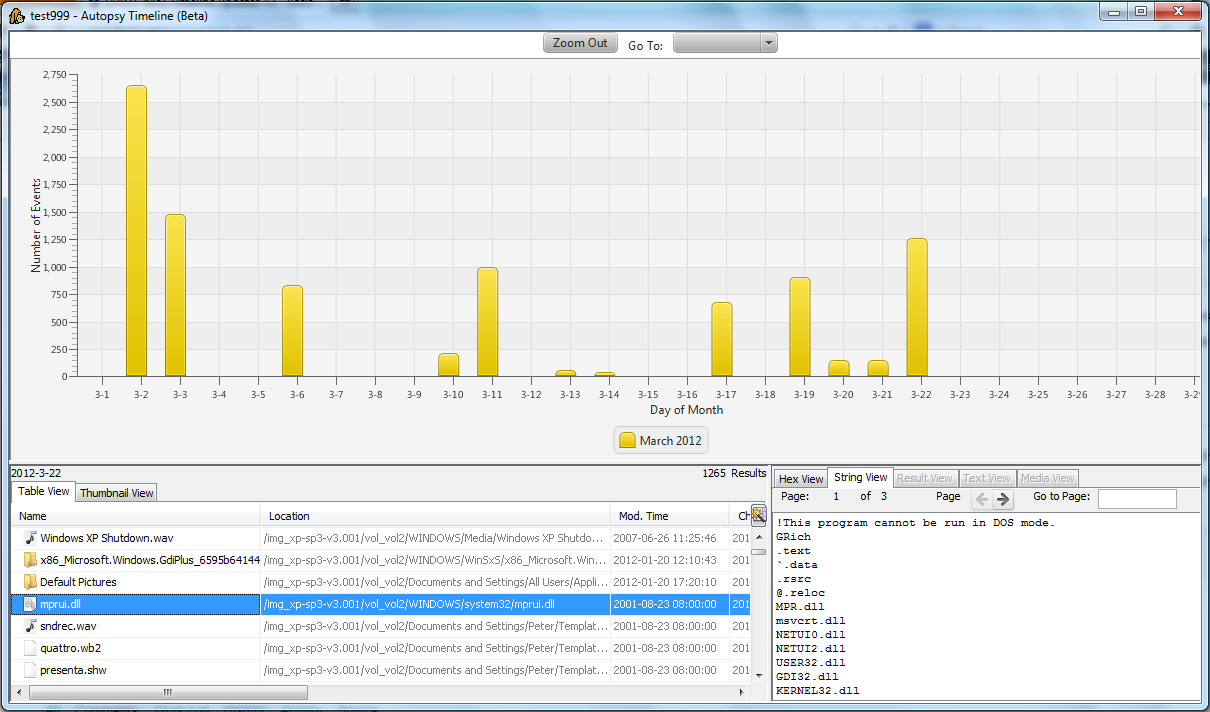
Add-on Viewers show data in a more complex way than the three panel design. As an example, the timeline viewer (screen shot) displays the timeline data in graph form.
Several features were added to make sure Autopsy was easy to use for non-technical users.
- Wizards are used in several places to guide the user through common steps.
- History is maintained so that the user can use back and forward buttons to back track after they have gone down an investigation path.
- Previous settings are often saved with the modules so that you can more easily analyze the next image with the same settings as the last image.
Autopsy tries to be non-invasive with popups and messages from the background tasks that are running. The motivation for this is that you could be focusing on an investigation path based on some web activity or keyword search results. By having to deal with messages from background ingest modules, you could get distracted. The ingest inbox is where modules send messages. You can then open the inbox when you are ready to see the results, review what has been found since you last opened it, and choose which results to start focusing on.
I found so many interesting stuff in your blog.
ReplyDeleteAutopsy
Postmortem Mesothelioma Diagnosis